
Article Summary
An ice bath chiller sample order should qualify both the product and the supplier before a buyer commits to inventory. Importers, distributors and cold plunge brands should define the sample specification, inspect packaging and construction, test cooling under recorded conditions, verify the water circuit and electrical configuration, review documentation, assess serviceability and establish a controlled reference for future production. This checklist turns a sample from a demonstration unit into evidence for a trial or bulk-order decision.
Quick Outline
- Define what the sample must prove
- Freeze the configuration before payment
- Review documents before shipment
- Inspect packaging and the delivered product
- Test cooling and temperature stability
- Test water flow, noise and optional functions
- Evaluate maintenance and after-sales support
- Create an approved reference sample
- Decide whether to approve, correct or reject
- Move from sample to trial production
What Should an Ice Bath Chiller Sample Prove?
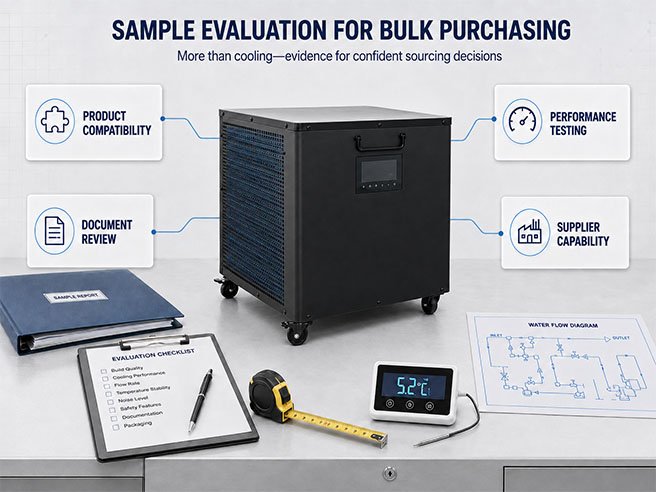
A sample should answer four separate questions:
- Product fit: Is this configuration suitable for the target users, tub, climate and installation?
- Performance: Does it meet the agreed requirements under defined test conditions?
- Commercial readiness: Are the packaging, documentation, accessories and customer experience ready for the intended sales channel?
- Supplier readiness: Can the manufacturer communicate clearly, diagnose issues and reproduce the approved configuration?
Receiving one functional unit does not prove mass-production consistency. It provides a controlled reference and reveals which requirements must be documented before a trial order.
The buyer should define pass/fail criteria before testing. Otherwise, a sample can feel “good” without providing enough evidence for a purchasing decision.
Step 1: Write a Sample Test Plan Before Ordering
Begin with the intended application rather than choosing a sample only by horsepower.
Record:
- Target customer or commercial application
- Tub water volume and dimensions
- Indoor or outdoor installation
- Typical and maximum ambient temperature
- Starting and target water temperature
- Required cooling time, if commercially important
- Expected operating hours and user frequency
- Pump, filter and plumbing arrangement
- Acceptable installation and maintenance requirements
- Destination market and electrical configuration
- Features that are essential, optional or not required
A residential product and a chiller intended for a high-use recovery studio should not be evaluated with identical assumptions.
Establish Objective Acceptance Criteria
Where possible, define measurable criteria for:
- Cooling performance
- Temperature stability
- Water leakage
- Noise under an agreed test method
- Electrical configuration
- Included accessories
- Label and manual accuracy
- Packaging condition
- Controller or connectivity functions
Avoid vague requirements such as “quiet,” “fast cooling” or “commercial grade.” Record the test conditions and the result expected under those conditions.
Step 2: Freeze the Sample Specification Before Payment
Ask the manufacturer to attach the confirmed configuration to the quotation, proforma invoice or sample agreement.
Product Configuration
- Manufacturer and exact model number
- Cooling-only or cooling-and-heating version
- Refrigeration configuration or rated capacity
- Intended water-volume range
- Stated operating temperature range
- Refrigerant type and charge information
- Product dimensions and weight
- Indoor or outdoor installation limitations
Water System
- Pump included or external
- Recommended water-flow range
- Filter housing and cartridge
- Inlet and outlet sizes
- Thread or quick-connect specification
- Hose quantity, diameter and length
- Drainage and priming requirements
- Included fittings and adapters
Electrical and Controls
- Voltage and frequency
- Plug and power-cord specification
- Rated current and power
- Recommended circuit requirements
- Controller type
- Wi-Fi, Bluetooth or app only if included
- Radio-module model where applicable
Commercial Presentation
- Product and rating labels
- Logo or private-label method
- User and installation manuals
- Accessories list
- Carton and internal protection
- Sample lead time
- Warranty and technical-support terms
Do not assume that a catalogue photograph represents the sample configuration. When an option is not included, remove it from the test plan instead of treating it as a failed feature.
Step 3: Review Documentation Before the Sample Ships
The sample stage is a useful time to identify missing or inconsistent documents. Ask for the materials relevant to the exact product and destination, which may include:
- Commercial invoice
- Packing list
- Product specification
- Rating-label artwork
- User and installation manuals
- Wiring or connection diagram where appropriate
- Refrigerant information
- Test reports and declarations relevant to the model
- Warranty terms
- Spare-parts list
Cross-check:
- Model number
- Manufacturer’s legal name
- Electrical version
- Product description
- Refrigerant information
- Labels and manual
- Models covered by any test reports or declarations
A certificate image or CE logo by itself does not establish that the exact sample is suitable for sale in a particular market. The importer should obtain qualified, destination-specific compliance and customs advice before commercial production.
For a broader discussion of customs, Incoterms and importer responsibilities, use the guide to importing ice bath chillers from China.
Use an Accurate Customs Description and Value
Samples may still be subject to customs entry, value, classification and other requirements. Do not request artificial undervaluation. Give the customs broker an accurate description, invoice, product specification and intended use, and confirm the destination’s treatment before shipment.
Step 4: Inspect the Shipment Before Powering On
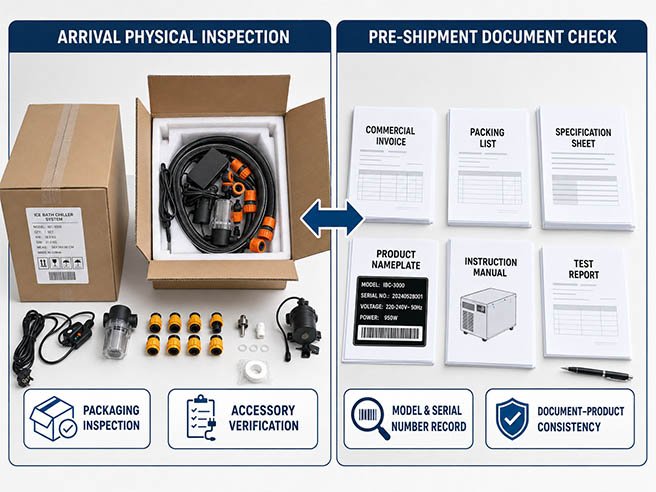
Photograph the unopened carton, labels and any visible damage before moving or unpacking the product. Follow the manufacturer’s instructions regarding storage orientation and waiting time before startup after transport.
Packaging Inspection
- Correct consignee, model and carton labels
- No punctures, crushing or water damage
- Orientation and handling marks present where required
- Adequate foam, corner and panel protection
- Product cannot move excessively inside the carton
- Hoses and accessories separated from painted surfaces
- Manuals and small parts secured
- Pallet or base protection suitable for the intended shipping method
Record not only whether the machine survived but also whether the packaging would be suitable for repeat distribution and last-mile handling.
Product and Accessory Inspection
- Model and serial number recorded
- Housing finish and panel alignment acceptable
- Handles, wheels or feet secure
- Display and controls aligned
- Inlet, outlet and drain undamaged
- Power cable and plug correct
- Filter housing and fittings undamaged
- Labels readable and accurate
- Accessories match the packing list
- Branding matches approved artwork
Photograph each side, label, connection and included accessory. These records help separate shipping damage from production issues later.
Step 5: Build a Controlled Test Setup
Use a setup that resembles the customer application and record every important condition.
Test Record
Record:
- Sample model and serial number
- Test date and location
- Tub type, volume and insulation
- Actual water volume
- Ambient temperature
- Starting water temperature
- Target setting
- Pump and filter configuration
- Hose diameter and approximate length
- Whether the tub is covered
- Whether a person enters the water during testing
- Measurement tools used
Use an independent thermometer where practical. Comparing its reading with the controller can reveal sensor placement or calibration differences.
Safe Installation Check
Before startup:
- Follow the manufacturer’s installation instructions
- Confirm the electrical supply and circuit are appropriate
- Provide required ventilation clearance
- Check hose direction and tightness
- Prime the water circuit as instructed
- Ensure the pump is not run dry
- Keep electrical connections protected from water
Do not open electrical panels or the sealed refrigeration circuit unless the work is permitted and performed by qualified personnel.
Step 6: Test Cooling Performance
Record the water temperature at consistent intervals rather than relying on an impression that the unit “cools quickly.”
Cooling Test Table
| Time | Water temperature | Ambient temperature | Controller status | Observations |
|---|---|---|---|---|
| Start | ||||
| 30 minutes | ||||
| 60 minutes | ||||
| 90 minutes | ||||
| Target reached |
Evaluate:
- Pull-down time under the recorded conditions
- Difference between displayed and independent temperatures
- Whether the target is reached
- Operation of compressor, fan and pump
- Error codes or unexpected shutdowns
- Condensation and drainage behavior
Cooling results depend on water volume, ambient temperature, insulation, plumbing, flow and heat entering the tub. Do not generalize one favorable indoor test into a universal marketing claim.
Temperature-Holding Test
After reaching the target, continue the test long enough to observe normal cycling.
Record:
- Highest and lowest measured temperatures
- Cycling pattern
- Unexpected stops or restarts
- Pump interruptions
- Error codes
- Changes when the tub is uncovered or used
Temperature stability and repeatable operation are often more commercially important than the lowest number shown on the controller.
Optional Heating Test
Test heating only if the confirmed model includes it. Use the same controlled approach and verify that product content, labels and manuals accurately describe the function.
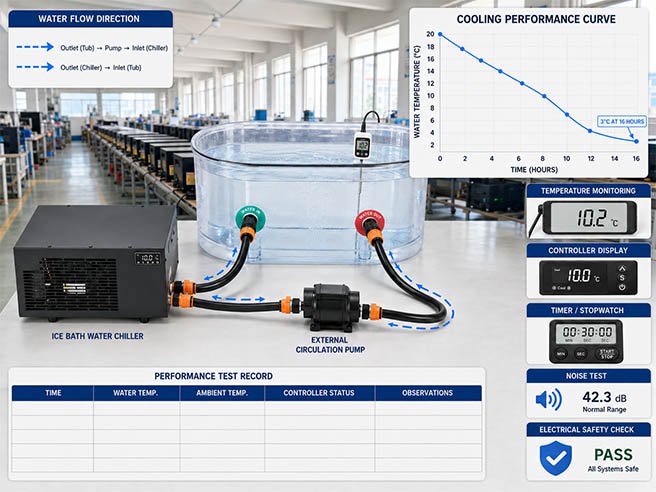
Step 7: Test the Complete Water Circuit
Cooling performance depends on proper water flow.
Check:
- Correct inlet and outlet direction
- Stable flow without repeated air locking
- No hose collapse or severe restriction
- No leakage at fittings, housing or drain
- Pump starts and restarts correctly
- Filter can be removed and reinstalled
- Priming and draining are practical
- Connections are suitable for the intended tub
- Maintenance does not require unexpected tools or adapters
Record the pump and filter configuration used in the test. A result obtained without the intended filter or with different hoses may not represent the sellable system.
If the buyer will combine the chiller with a locally sourced tub, test that exact combination before approving claims or instructions.
Step 8: Evaluate Noise and Vibration
Noise varies with the operating mode, installation surface, room acoustics and distance from the unit. If it matters to the target customer, agree on a repeatable measurement method.
Observe:
- Startup noise
- Compressor, fan and pump operation
- Vibration through the floor or tub
- Panel or fitting rattles
- Noise after the system warms up
- Shutdown and restart sounds
Record the approximate microphone distance, location and operating conditions if using a sound meter. Do not compare supplier decibel figures unless their methods and conditions are equivalent.
For more detailed measurement and installation guidance, read the guide to ice bath chiller noise levels.
Step 9: Test Controllers and Optional Connectivity
If the approved configuration includes an app or wireless function, test:
- Initial pairing
- Temperature-setting synchronization
- Mode selection
- Reconnection after power loss
- Reconnection after router or network interruption
- Scheduling only if supported
- Error or status display
- Supported phone platforms and regions
- Account, privacy and app-availability considerations
Ask who maintains the app or cloud service, how firmware changes are managed and what happens if a customer cannot connect. Do not advertise remote diagnosis, multiple users or update functions unless they are documented and tested.
Step 10: Evaluate Maintenance and Serviceability
Perform routine tasks permitted by the manual:
- Replace and reinstall the filter
- Drain and refill the system
- Disconnect and reconnect hoses
- Clean accessible water-path components
- Restart after draining
- Follow the published maintenance schedule
- Locate model and serial information
Assess whether the instructions are clear enough for the target customer and support team.
Request a Model-Specific Spare-Parts Plan
Ask:
- Which consumables require regular replacement?
- Which parts can be replaced by the customer or distributor?
- Which work requires a qualified technician?
- Which parts should accompany the first commercial order?
- What are the normal replenishment lead times?
- How are revised parts matched to older serial numbers?
Possible spare parts depend on the model. Avoid publishing a universal list that encourages unqualified repairs to electrical or refrigeration systems.
Step 11: Test the Supplier’s Technical Support
Use genuine questions that arise during setup and operation. Evaluate whether the supplier:
- Understands the symptom and asks relevant questions
- Requests useful photos, videos or operating data
- Provides clear and safe diagnostic steps
- Identifies the correct model and parts
- Supplies diagrams or instructions where appropriate
- Escalates complex cases to qualified technical staff
- Records and follows up on unresolved issues
Record response quality, not only response speed. A fast but inaccurate answer creates more risk than a carefully investigated one.
Step 12: Review Private-Label Details Only When Applicable
If the sample is part of a branded project, verify:
- Logo placement, size, color and durability
- Rating plate and product labels
- Manual, warranty card and QR codes
- Carton artwork and accessory packaging
- Model naming consistency
- App branding only if included in scope
Ask whether the sample uses the same production method planned for the commercial order. Hand-applied sample graphics may not represent mass-production printing.
For a full brand-development process, see the private label ice bath chiller guide.
Step 13: Create a Golden Sample and Controlled Specification
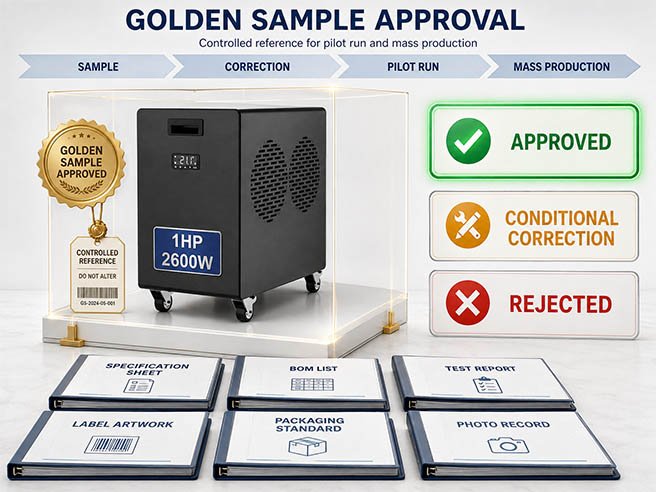
An approved sample should be supported by documents; the physical unit alone is not enough.
The approval package can include:
- Signed product specification
- Approved model and electrical version
- Key component list or controlled bill of materials
- Accessories list
- Label and branding artwork
- Manual revision
- Packaging specification
- Firmware or controller version where relevant
- Test conditions and results
- Approved corrections
- Photographic record
Keep the approved unit as a golden sample if practical. Do not place it into general use where wear, repair or modification would make it an unreliable production reference.
Agree that material changes to key components, electrical configuration, controls, labels, packaging or documentation require written buyer approval or documented equivalence.
Step 14: Make an Approve, Correct or Reject Decision
Do not reduce the evaluation to pass or fail if corrective work is possible. Classify findings:
- Critical: safety, compliance, incorrect electrical configuration, serious leakage or inability to meet essential performance requirements.
- Major: issues that affect commercial use, installation, reliability, packaging or customer support.
- Minor: cosmetic or documentation issues that do not prevent safe and intended use but still require correction.
Then choose one outcome:
Approve
The sample meets the defined criteria, documentation is acceptable, and the controlled configuration can proceed to the next purchasing stage.
Conditional Approval
The supplier must complete documented corrections. Decide whether photographs, revised documents, replacement parts or another physical sample are required to verify them.
Reject or Re-Evaluate the Model
The product does not fit the application, essential requirements are not met, or the supplier cannot provide an acceptable corrective plan.
Do not let the sunk cost of a sample justify a larger order.
Sample Approval Checklist
Specification and Market Fit
- Application and target customer defined
- Exact model and configuration confirmed
- Water volume and climate suitability evaluated
- Electrical version correct
- Essential and optional features separated
Delivery and Construction
- Packaging condition documented
- Product and serial number recorded
- Construction and appearance acceptable
- Accessories complete and compatible
- Labels and branding accurate
Performance
- Test conditions recorded
- Cooling result meets the agreed criterion
- Temperature-holding test acceptable
- Water flow and filtration acceptable
- Leakage inspection passed
- Noise and vibration acceptable
- Optional functions tested only where included
Documentation and Support
- Specification, manual and labels reviewed
- Relevant product documents cross-checked
- Spare-parts plan received
- Warranty responsibilities understood
- Technical-support response evaluated
Production Readiness
- Findings and corrective actions closed
- Golden sample or reference record established
- Controlled specification approved
- Change-control method agreed
- Trial-order inspection plan agreed
Moving From Sample to Trial Order
A successful sample confirms an individual unit and supplier process. A trial batch evaluates areas that one sample cannot demonstrate:
- Batch consistency
- Packaging consistency
- Shipping-damage rate
- Real installation questions
- Customer feedback
- Support workload
- Warranty patterns
- Sell-through and inventory assumptions
A practical sequence is:
Sample qualification → Corrective actions → Controlled specification → Trial order → Market and batch review → Repeat production
The quantity should match the buyer’s validation stage and commercial plan. There is no universal sample or trial-order quantity. Read the complete ice bath chiller MOQ and production guide before scaling.
Working With CHILLMEND on a Sample Order
CHILLMEND supports importers, distributors and cold plunge brands with model selection, sample configuration, private labeling, documentation coordination, production planning and after-sales support. The company was established in 2022, and its HVAC industry experience dates to 2010. Its manufacturing operation includes a 5,000-square-meter facility, two production lines, a 10-person research and development team, and stated annual capacity of 10,000 units.
Buyers can review CHILLMEND’s ice bath chiller models, OEM capabilities, manufacturing and quality-control process and certification information before defining a sample.
Sample availability, configuration, documentation, lead time, warranty and commercial terms are confirmed for the selected model and destination market.
Frequently Asked Questions
What should an importer test on an ice bath chiller sample?
Test the agreed cooling performance, temperature stability, water flow, leakage, noise, controls, electrical configuration, installation, maintenance and packaging. Also review documents, spare parts, warranty and supplier technical support.
How many samples should a distributor order?
One may be sufficient when a buyer has already shortlisted a configuration. Multiple samples can be useful when comparing genuinely different applications or platforms. Order only enough variants to answer a defined purchasing question.
Are sample ice bath chillers exempt from import duties?
Do not assume so. Treatment depends on the destination, classification, value and import circumstances. Confirm the declaration, value, duty and documentation with a customs broker or relevant authority.
How long should sample testing take?
There is no universal duration. The plan should include complete cooling and holding cycles, repeated startup, drainage and maintenance operations appropriate to the intended use. Testing should be long enough to evaluate the defined criteria rather than a fixed number of hours.
Does one approved sample guarantee production quality?
No. It establishes a reference. Trial and mass production still require controlled specifications, change approval, batch inspection and appropriate finished-unit testing.
Should the approved sample be kept?
Yes, when practical. Keep it identified and unchanged as a golden sample, supported by specifications, artwork, test records and photographs.
When should a buyer move to a trial order?
Move forward after essential criteria are met, corrective actions are verified, the configuration is frozen, documentation is acceptable and the trial-order inspection plan is agreed.
Request an Ice Bath Chiller Sample
Share your destination market, intended application, tub volume, climate, electrical requirements, required features, branding scope and future purchasing stage with CHILLMEND.
Contact CHILLMEND to request a model-specific sample configuration and quotation.